Students' ICT Induction
This guide will help you get started with using the STRS school computer network. Keep this guide safe in case you want to refer back to it. Ensure you read each section carefully.
Please note: Any accounts you setup will work for both the mobile (app) and desktop (laptop/computer) version of the service – you do not need to sign up again.
If possible, you should follow along on a laptop as it is generally easier to see all the options.
Further ICT Support
If this document hasn’t answered your question, or you’re having trouble registering or setting something up, then please feel free to contact the ICT Network Manager:
Mr Matt Hopton - mph@strs.org.uk
Please be aware there may be a delay in for the first few weeks of the year - I get lots of enquires!

How to login (Within school)
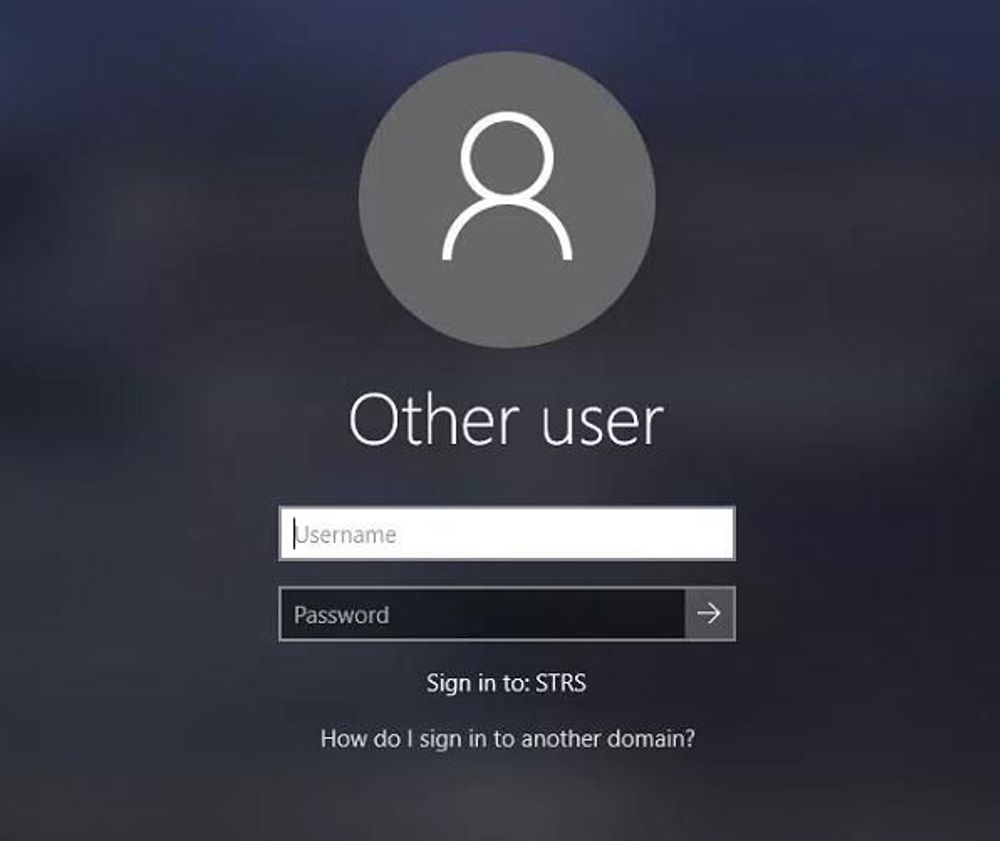
You should see a screen like this.
You may need to wake the computer up by wiggling the mouse or tapping a key. Check the Username field is empty – you may not see a space so delete anything in the Username field.
STRS usernames look like this: 17SMITJoa This is the username for a fictional student called Joanne Smith who joins STRS in 2022.
Your username is made up from the following information:
- The year you entered Y7 - 17
- The first 4 letters of your last name - SMIT
- The first 3 letters of your first name- Joa
If your names are shorter then just use the characters you have. For example: Xi Cho would be 17CHOXi
Work out your username.
You also need a password. Your form tutor has a list of passwords, or your parents can reset it through Parent Gateway.
To log in to the school network:
- Enter your username in the “username” field
- Enter your password
Then click the arrow at the end of the password field, or press ENTER on the keyboard. When you are logged in you will see a normal computer screen.
At the bottom left of the screen you will see these icons:
From left to right these are:
- Windows Icon
- Microsoft Edge (internet browser)
- File Explorer (for finding files in your user area)
- Word
- Outlook (your school email)
- Teams (will be used for some lessons, including Computing)
Passwords
Passwords are important – they are the equivalent of the front door lock on your house! You will need to choose a password that is secure. This means it is:
- At least 12 characters long
- Not easy to guess
- Is not a dictionary word
Length is probably the most important security feature, but remember:
- you have to type this password correctly every time you to log in
- you need to be able to remember this password
You can use numbers, letters and some special characters (*&^%$£!<>)
We recommend you think of a colour, animal and food item (in any order) and use this as your password.
An example of a strong password is: PurpleUnicornBread
IMPORTANT: NEVER tell anyone your password. If you think someone knows your password, change it immediately.
Decide on a strong password. You can use the space below to write a clue to help you remember your password if you wish to.
The system will automatically reset passwords that it thinks are too weak.
Changing your password
In School
If you know your password and want to change it: Log in and press CTRL and ALT and DEL all at the same time. You will see a blue screen with several options. One is Change Password. If you can’t remember your password:
- You can ask your teacher to reset your password for you using ClearSky.
- You can come to the IT office in the B block and use the password reset computer there.
- You can use the signing in machines in the Sixth Form Centre.
At Home
Your parents can change your password for you using their Parent Gateway account. They need to log in and click on ICT Details in the left side menu. This will then give them an option to reset your password.
Signing In and Out (Sixth Form Only)
We use a digital signing in/out system at STRS. You can use your normal username and password to sign in and out, but you can also use your fingerprint, which is easier and quicker. The fingerprint data is stored in school on a secure server and is only used for internal school purposes such as signing in/out and printing.
There are four fingerprint machines that can be used to sign in and out: three in the Sixth Form centre corridor and one at Reception. Simply follow the on-screen instructions.
Signing in and out of School is available for Year 12 during lunchtimes only. You can also sign out for other reasons via reception.
You can also sign in and out at lunchtime by scanning one of the QR codes in the Sixth Form Centre.
Registering in lessons and study periods
A formal register is taken in every lesson. You will have some timetable sessions that are not taught lessons (these are Self Study lessons such as non-contact times or Private Study periods).
You still need to register for these, but you can do so using the Teams app on your phone.
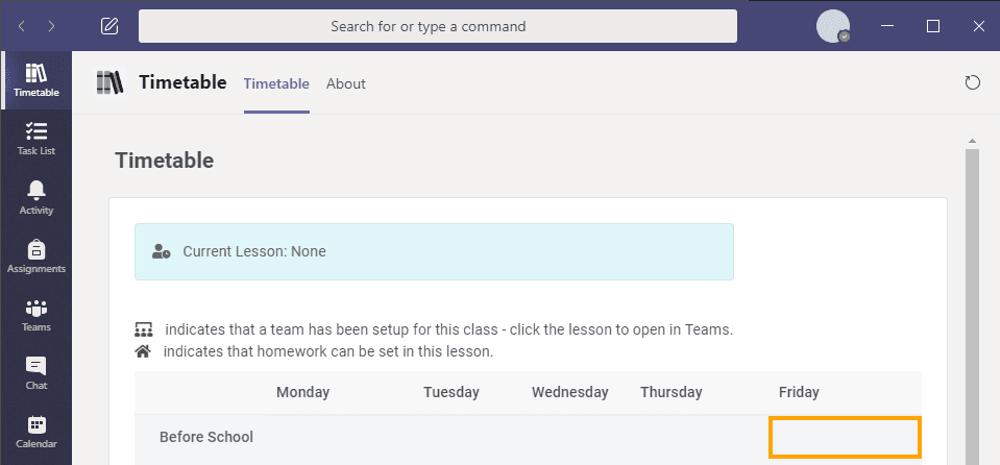
- From Teams, go to the Timetable tab.
- If the current lesson is a free period, or private study period, the ‘Self-Study Check In’ button appears at the top of the screen
- Click the button and enter a study location for this period
- Click the check in button to record your response.
E-Safety
You have already learned something about e-Safety because it is really important. Make a habit of considering your e-Safety each time you use a computer or connected device.
Remember what you have learned and use this knowledge to stay safe.
School WiFi
WiFi is available in school for use on phones and laptops. To access the WiFi network:
- Connect your wireless device to the STRS-Students network.
- Use your normal network username and password to login.
- If prompted, set the 'Level 2 Authentication Method' to 'MSCHAP v2', and 'CA Certificate' to 'Use System Certificates'
- If prompted, the 'domain' for the wifi is 'strschool.co.uk'
Note that by using the school WiFi you are agreeing to the Acceptable Use policy as published on the school website.

The School Website
The school website has a lot of information and links on it. The main page has announcements, upcoming events, a link to the school calendar. It will even tell you if the school is closed for a snow day!
There are also some other areas you should be aware of. For example, every workplace that uses computers will have an “Acceptable Use” policy that says what you are allowed to do and what you must not do with the computers and internet connection.
The school Acceptable Use policy is on our website. It is found by clicking About Us (middle top) and looking down the left side menu for Governors and Policies. Scroll down until you get to the ICT policy (the school has a lot of policies so you will need to scroll a fair way!). Like many official documents, this policy is long and full of information. You should read section 7 which is the bit about pupils, but you can read it all if you wish.
From home
You can access the school website by opening a web browser and typing the url: www.strschool.co.uk This will open the school website home page. The school website has lots of information on it, but perhaps the most useful for us is the little briefcase icon in the top left corner – it is the right most icon at the bottom in this image.
Click this icon is for Remote Access and other useful links.
In School
You can access the school website using Edge.
Remote Access
Here at STRS, we use a Remote Learning Environment (RLE). The RLE allows pupils and staff to use the school system as if they were present within the school walls. This means that their home computer simply acts as a screen and keyboard for the session.
The main benefit to this type of setup for users is that there is no extra software to purchase or install at home. In addition, because users are effectively using a machine in school, they are subject to the same high-security regulations as they would be in the building - this includes internet filtering and enterprise-level anti-virus scanning. It also means the end of emailing large projects back and forth!
- To access Remote Access, visit the school website: https://strschool.co.uk and click the briefcase icon in the top left.
- Scroll down, you will see a menu with devices – select the option that corresponds to how you are going to be connecting.
- Follow the instructions given for the option you have selected.
School Email
Every pupil at STRS has a school email. This is the email you should use for school things, for example: if you want to email work to a teacher or ask them a question.
Your school email address is:
yourusername@my.strschool.co.uk
Notice the “my” and the dot before the school domain name “strschool.co.uk”. You MUST include these. Also, there is only one “s” in the middle of the domain name – it is STR school but without the space.
So, our example user called Joanne Smith would have the email address:
17SMITJoa@my.strschool.co.uk
You can access your school email in school by clicking on the Outlook icon at the bottom of the screen. This will log you in automatically.
To access your email from home, open the school website, click on the Remote Access icon and pick Email from the menu.
You can also setup access to your school email on your phone. To do this; install Outlook from the app store and login using your school email and normal account password.

Satchel One (Homework)
Students do not need to create an account – we do this automatically when they join STRS.
Logging in on a computer
- On a computer, your child should visit https://www.satchelone.com
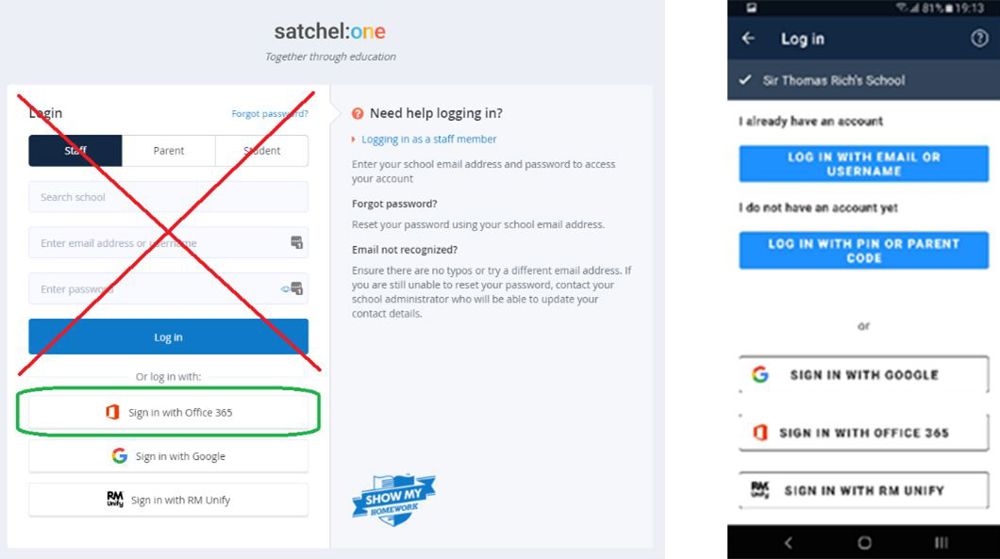
- Ignore the top section, and click ‘Sign in with Office 365’
- Enter their school email address (something@my.strschool.co.uk) and school password into the box in order to login. (Be careful with the STR School bit – there are only 2 ‘s’es!)
- The school password will be 12 or more characters.
Logging in via Remote Access
(Setting up Remote Access is discussed later in this document.) Satchel One will automatically login when accessed via Remote Access, it can be found in Launchpad.
Logging in via a Mobile Phone
- Download and install the ‘Satchel One’ app from the app store.
- Open the Satchel One app. It should open to a screen with a ‘school search’ box (if it doesn’t, sign out of the app if that’s an option and click the arrow in the top left until you see this screen).
- Search for ‘Sir Thomas Rich’ and choose the school.
- At this login screen, ignore the top options and choose ‘Sign in with Office 365’. (Be aware - sometimes the keyboard can cover the bottom buttons)
- Enter their school email address (something@my.strschool.co.uk) and school password into the box in order to login. (Be careful with the STR School bit – there are only 2 ‘s’es!)
- The school password will be 12 or more characters.
- If prompted, answer ‘yes’ to ‘do you want to stay signed in’.
- The app will briefly return to the login screen – don’t click anything, just wait for up to 10 seconds. It should then login as your child.
Microsoft Teams
The school is using Microsoft Teams to deliver some online lessons. Some departments also use Teams to set homework and quizzes.
Microsoft Teams is a collaborative working platform that we use to set and submit work. We have also used Teams Meetings to deliver remote video lessons when the school is closed. You will learn more about Teams as we use it in lessons.
In school
To open Teams, click the Teams icon at the bottom of the screen (in school). Teams will start and will show you all the Teams you are a member of.
At home
You need to install Microsoft Teams on your home pc or device:
- Follow this link: https://www.microsoft.com/en-gb/microsoft-teams/download-app
- Run the installer and when prompted, login with your school email address and normal network password.
- In the left hand bar, click 'Teams' and then navigate to the class you require, or use the calendar view.

Navigating Teams
Once installed, and you've logged in, the Teams interface will be shown.
When navigating in Teams, always work from the left hand menu:
Timetable Shows you your current school timetable. Clicking on a lesson will take you to that class Team (if enabled).
Task List Shows you any tasks that have been set by your teachers in Teams. This will likely be empty.
Activity Shows you anything that happened whilst you were away.
Assignments A different view of any tasks in your Task List. Again, likely to be empty.
Teams Shows you all the classes that have Teams enabled (see more detail below).
Chat Allows you to have 1:1 conversations.
Calendar Shows you any online virtual meetings that your teachers may have setup for you to join. Click the 'Join' button to join a meeting.

Inside a Team
Click 'Teams' and then a class that you are a member of.
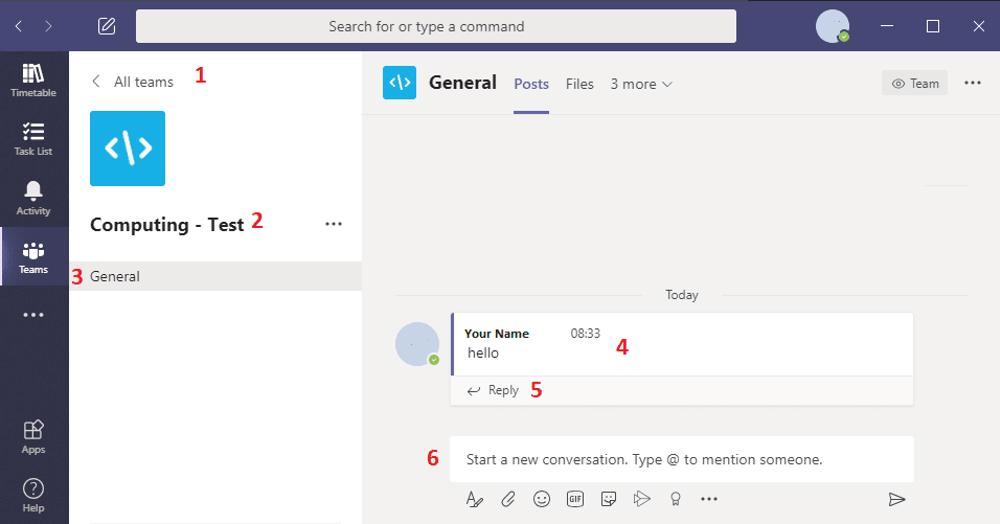
This will take you to the following screen.
- Takes you back to the classes list
- The current class subject and name
- The 'channel' list - most classes will only have a 'General' channel. Your teachers may set up additional channels to allow you to discuss different topics.
- A conversation
- Click the REPLY button to reply to a message - this helps to make conversations easy to follow. If you want to make a new line, press SHIFT+Enter.
- If you can't see a conversation, you can start a new one here.

SharePoint
The school uses SharePoint as a central repository for lesson resources, teaching materials, exam papers and more.
You can access SharePoint via:
- The internal homepage on school computers
- Launchpad
- By installing the 'SharePoint' mobile app from your app store, then logging in with your school email address and password.